Monday, July 25, 2016

Monday Made it: Classroom Store Part 2


I'm linking up with 4th Grade Frolics for another Monday Made it!


I have a couple of projects that I am sharing today, including one that I have been looking forward to doing all summer: my classroom storefront!

In June, I blogged about the classroom currency I will be using this year: flamingo bucks. I have always wanted a storefront for the classroom, so this summer I decided to go for it!

I do very well when building things from a kit, but designing and building something from scratch... no, thank you! Luckily, my mom is also a crafter and has no problem wielding power tools!

I started with an old black bookshelf from my classroom. I used contact paper to cover the insides.


I got the bins from the dollar store and printed some price tags. I also decided to add some green washi tape around the edges of the shelf.


We used some wood strips to build the sides and top of the storefront. It took us quite a while and may or may not be slightly crooked on one side... oops! 

I had some leftover flamingo fabric from my desk skirt project last summer. We decided to use it to make an awning for the top of the store.


 My mom designed and made the awning, complete with scalloped edge.


When I think of a storefront, I always think of a scalloped awning! :)

We also added strips of the fabric on each side and tied them to look like curtains. 


I am so excited and can't wait to see it in the classroom!

That's it for this week, let me know what you think in the comments!

Monday, July 18, 2016

Monday Made it: Lunch box carrier, brag tag organization


I'm linking up with 4th Grade Frolics for another Monday Made it!


First up, a quick and easy project- my new lunch box carrier!

I found this rolling cart at Target (or you can find it here)


I got one for transporting my things back and forth from the classroom, but then my pod-mate mentioned that it would be great for a lunchbox carrier, and I had to do it! I usually use a laundry basket and have two kids each carry an end, but last year I had so many kids that brought a lunch box that I often needed four kids to carry it! Too much hassle!

I will admit, I can be a bit of a lazy crafter... I don't always measure before I make labels. Sometimes I just wing it! 


Luckily for me, it worked out and the label fits perfectly!


I think it turned out really cute! :)


This is something that I have been meaning to get to for years: relabeling my brag tag drawers.


I got this 64-drawer supply holder on amazon a couple of years ago to store my brag tags. I did a half-hearted attempt at labeling it a few years ago, but I wanted something that was more uniform and up to date.


I made some simple labels, cut them out, and taped them inside the front of the drawers. I didn't bother with laminating them as I will be the only one interacting with the drawers. 


I love how simple it looks and with all of the brag tag sorting, I am learning the layout pretty quickly.


That's it for my made-its this week! I was planning on a few more, but my poor Maggie has had a pretty rough week. Between a couple of emergency vet visits and there medications, she hasn't been the happiest of kitties (and I have been a very stressed kitty mama)! 


Luckily, this last visit and medication seems to have done the trick. Maggie seems to have recovered and is back to her sweet self!

Thank you so much for visiting! Make sure you visit 4th Grade Frolics to check out the other awesome made-its!

Monday, July 11, 2016

Monday Made It: Quiet Zone Light, Book Nook, and Brag Tags


I'm linking up with 4th grade frolics for another Monday Made it! 


This week, I am building on my idea of a book nook from a couple of weeks ago, (hopefully) solving a guided reading problem, and getting ready to celebrate some success!


I love my Cricut, I really do... I just don't use it as much as I should! It has been sitting in my closet collecting dust for too long, so this week I decided to get it out for a made it!

I wanted a visual way to remind my students that they are not to disturb guided reading time. I briefly considered a hat of some sort, but then I stopped myself- am I really going to want to wear a hat every day during guided reading? As much as I like making hats, the answer to that was no.

There were several requirements for my project:
1. I wanted it to be something I wouldn't need to continually interact with. 
2. I wanted it to be easily seen, but not in the way of the guided reading table/supplies.
3.I wanted it to match my decor (naturally) :)

I came up with a quiet zone light!

I used a glass block with a stand and light. I cut out the Quiet Zone sticker on cricut vinyl and stuck it on the front of the block. I've never worked with adhesive vinyl before, so I was a bit nervous. 


I was able to get most of the air bubbles out, but there are a few still on there. I take comfort in the fact that it will be on top of a shelf, so no one will be inspecting it close up. :)


Disclaimer: I couldn't get a really good picture of it lit up, it looks MUCH better in person!

I like it, but I am considering adding some ribbon around the edges. Maybe for next week?


A couple of weeks ago, I talked about the book nook that I want to make in my classroom library with shelves and a bench. I wanted to make sure that everyone knew it was a book nook, enter: pennant banner!


After printing the pieces and cutting them out, I laminated them(and cut them out again). I was going to add the ribbon, but I didn't have enough, so that will have to come later. Just imagine that it is strung on bright pink polka dot ribbon!

Confession: I actually made parts of this project twice. My classroom projects/purchases have officially taken over my apartment and I was unable to find the printed parts, so I had to print them again. :(


This project is also part of the book nook that I am working on- the bench!

I got one of those black three cube organizer shelves and put it together. I wanted to use the openings for book baskets, so I added some leftover contact paper so they wouldn't get scratched.


Maggie loves the bench and is constantly on top of it! I found a pretty turquoise cushion for the top, but I don't want to get it all full of cat hair, so I am waiting on adding it until I get it in the classroom. I can't wait to see what it looks like when all put together!


I'm not sure that this next one really qualifies as a "made it," but it is so cute that I just have to share!

I found this pillow cover on etsy and knew that it was absolutely necessary for my classroom rocking chair!


I added a pillow form (hence the made-it!) and... that was it! 


So in love!


Last up, something I have wanted to make for ages, but have been putting off: math standards brag tags!

I use brag tags quite a bit in my first grade classroom and wanted to make some that were tied to specific math standards/targets. I made one last year (I can count to 120!) and it was a HUGE motivator! Even my little friend who suddenly became"allergic to paper" whenever we had math work (true story) wanted to write all of the numbers to 120 to get it!


I used the Common Core math standards as a jumping off point, and added in a few extras that we cover in our district (identifying and counting coins).


Voila! Now I just have to laminate/cut/punch/sort all of them... 

You can find the brag tags here.


Thank you so much for visiting! Make sure to check out all of the other awesome made-its at 4th grade frolics!


Sunday, July 3, 2016

Monday Made it: Earbud storage, some fun new seating, and more!


I'm linking up with 4th Grade Frolics for another Monday Made it!


Last week was pretty busy. I had several big projects, so this week I forced myself to only do one a couple of little ones. 


I found these old dollar store purchases when I was packing up my classroom for the summer. I'm sure I had an idea for the when I first bought them (which was at least a year ago...), but I couldn't remember what it was, so they had just been sitting in my classroom.


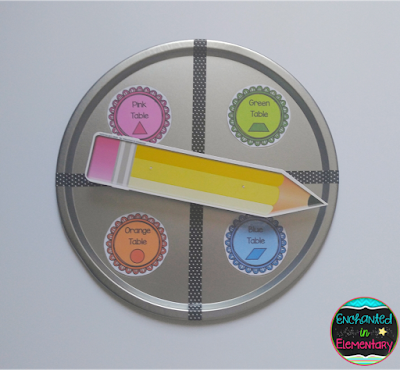
I decided that I wanted to make a spinner for calling tables or center groups.


I started with some washi tape (my new favorite thing, next to contact paper!) to divide the pan into four (relatively) equal sections.


I printed the labels, laminated them, and used double-sided tape to stick them to the pan. Each label has a table name and a center group shape.


I added the magnetic pencil spinner and that was it! Less than 10 minutes and I have a spinner that I have been having way too much fun playing with! 


Our team put earbuds on the first grade supply list for next year (as an optional extra). I am really excited for this! The headphones we have for the computers are a constant hassle! 


Anyway, I am sure that not everyone will bring in earbuds, so I found this pack of 10 on amazon for less than $7.00. I know, I know, they are suspiciously cheap, but I have held all of them up to my ear to test and they all worked (so far)! 

I wanted a way for kids to store their earbuds by the computers, but I don't really have a lot of empty space there. I decided on a bead box. I use the same size to store word work manipulatives such as magnetic letters and alphabet stamps and I really like them.


I made the labels and taped them on. That's it!


The earbuds fit really well and I'm sure it will look just as neat and organized when the kids start using it... 


I have recently discovered the classroom joy that awaits in Five Below! The only one that is remotely close to me is about 30 miles away, but my two trips there have been completely worth it!

If you didn't see my post on Friday, I got these two giant foam dice there. 


I am so thrillled with them and can't wait to use them in the classroom! They actually gave me a really good, slightly crazy idea for another made it. Let's see if it happens this summer!


I got these three yoga mats there to use as a seating option for centers.

I cut all three of them in half so I ended up with six mats, which is enough for a center group! 


I think this little metal pail is perfect for them!

That's it for this week's made-its! Leave me a comment and let me know what you think and make sure you check out the other awesome made-its at 4th Grade Frolics!